| Abstract: This application note describes the NISTnet software and its installation, and guides the user how to configure the network interface card as a router, as well as the configuration of TDMoP products under NISTnet. This article also demonstrates how to use TDMoP chips with or without internal SCT under NISTnet. Overview NISTnet is a network simulation software under Linux®, which allows Linux servers to simulate various network conditions like routers, such as congestion loss, packet reordering, or asymmetric bandwidth. NISTnet has an X-based user interface, which is also a core module extension for Linux. As a tool, controllable and repeatable experiments can be performed on NISTnet. These experiments can be network characteristic sensitive / adaptive applications, or control protocols can be set through a simple laboratory environment. NISTnet works at the IP layer and can simulate the end-to-end critical performance characteristics of different WAN environments. NISTnet also supports users to add custom group management to the system. Figure 1 shows a typical configuration of NISTnet. 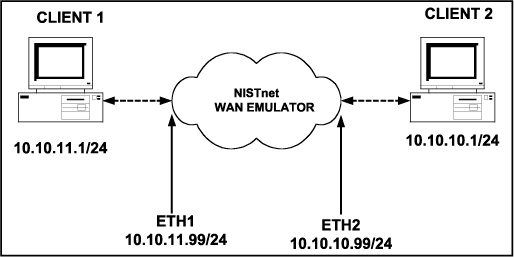 Figure 1. Typical NISTnet example This article provides the following instructions for use: Install the NISTnet software, configure the network interface card, and configure the TDMoP product for the router. Use the NISTnet TDMoP transmission device shown in Table 1 for this information. Table 1. TDMoP devices suitable for NISTnet
Hardware requirements The version of NISTnet is based on Red Hat® Linux. The hardware used for this installation must be compatible with Red Hat Linux 3.0 Enterprise Edition or higher. In order to successfully install, configure, and run NISTnet, the hardware must meet the following minimum requirements. 10GB hard disk 256MB RAM two network interface cards (NIC) NISTnet installation Linux kernel and software development kit are required to be installed. To install NISTnet, the user must have a "root" access entry, and the Linux kernel will be patched during the installation process. First, download the compressed file to a directory (eg / usr / local / src /). Then unzip the file with the following command: tar –zxvf nistnet-2.4.1.rad_patches.tar.gz The source file has been unzipped into the NISTnet directory under the compressed file directory (eg / usr / local / src / nistnet). Run the following command in the Linux source directory: Enter the directory usr / src / linux-2.4.20-8, and enter: make mrproper copies the kernel configuration file with the following command: cp make oldconfig make dep into the NISTnet directory: cd / usr / local / src / nistnet Run the following command: make clean ./configure make All questions during make install should be answered "NO". So far, NISTnet has been installed. Configuring the network interface card To configure these two NIC cards as routers, you must follow the steps below. Go to Main Menu> System SetTIngs> Network. Figure 2 shows the network configuration interface. 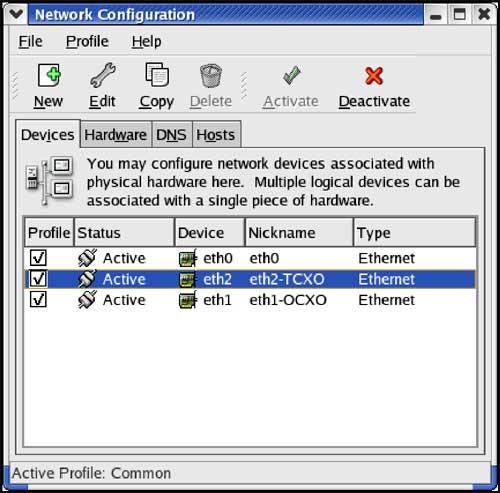 Figure 2. This network configuration interface will pop up when you start to configure the NIC card as a router. Select NIC eth1 or eth2. As shown in Figure 3 and Figure 4, configure the NIC card. Add the specified values ​​at the Address, Subnet Mask, and Gateway prompts. 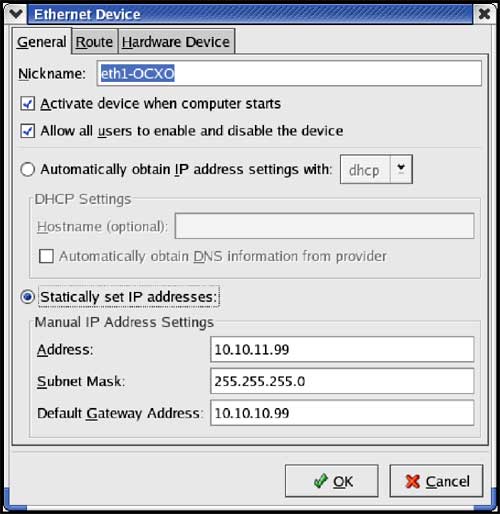 Figure 3. Configure eth1 NIC 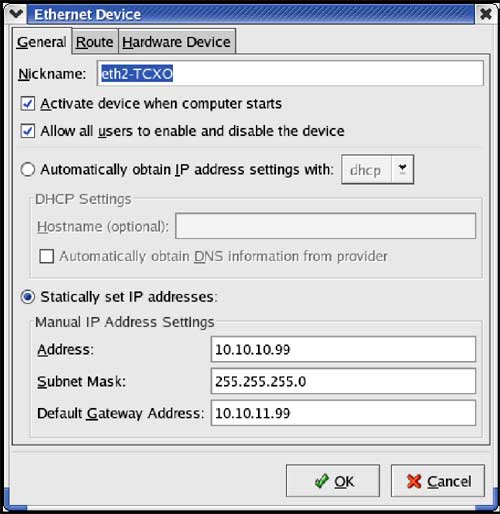 Figure 4. Configure eth2 NIC Configuring TDMoP Figure 5 shows an example of a typical adaptive clock recovery circuit. When the 10.10.10.1/24 device recovers the TDM service clock from the source TDM device, the circuit uses NISTnet as the WAN emulator. 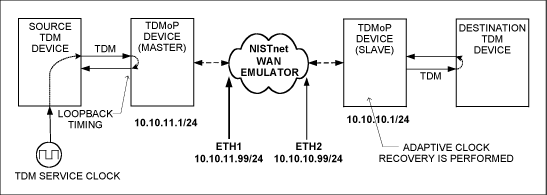 Figure 5. Typical clock recovery settings using NISTnet as a WAN simulator The following is a typical configuration of TDMoP master device using CESoP simulation in T1 framing mode. The TDMoP master device works in loopback mode. TOP (T1) Main Menu> General ConfiguraTIon 1. Source Mac address ... (0020D224D33C) 2. Source IP 1 ... (10.10.10.1) 3. Source IP 2 ... (10.10.10.1) 4. IP Mask ... (255.255.255.0) 5. Default Gateway ... (10.10.10.99) 6. Max HDLC Frame Size [1-1800] ... (1800) 7. ARP wrong IP (CPU) 8. Wrong IP ( Discard) 9. Not Eth Type (CPU) 10. ARP my IP (CPU) 11. Not UDP type (CPU) 12. Not TDMoIP type (CPU) 13. Bundle number does not exist (Discard) 14. OAM packet (CPU ) 15. Auto NegoTIaTIon (YES) 16. Rate & Duplex> (100M_FDX) 17. Default ------------------------------ ------------------------------- Main Menu> Interface Configuration> T1 Screen Configuration Link Number [1-8] ... (1) 1. Frame Type> (SF) 2. RX Config Gain Limit (SHORT Haul) 3. OOS Code type (OOS Code) 4. Data TX / RX OOS [0-ff] ... (7E) 5. Idle Code [0-ff] ... (7E) 6. TX / RX Signal Mark code [0-3] ... (F) 7. TX / RX Signal Space code [0-3] ... (1 ) 8. TX / RX OOS Signal MASK> (Space) 9. Clock Source> (LoopBack) 10. DSU / CSU (DSU) 11. DSU Mask> (0-133 feet) 12. Link Sync (62411) 13. Connect / Disconnect (Connect) 14. Recovery Clk Mode> (Auto) 15. Master's Side Clock Source> (Stratum 1) 16. Network type> (Router based) ------------------------------------------------ ------------- Main Menu> Bundle Configuration> CES Bundle Configuration Bundle ID [0-4095] ... (1) 1. Tx Bundle Destination> (Ethernet) 2. Rx Bundle Destination> (PCM) 3. Tx UDP Bundle [0-8191] ... (2) 4. Rx UDP Bundle [0-8191] ... (2) 5. Source IP addr> (IP 1) 6. Destination Main Mac addr ... (000000000000) 7. Destination IP address ... (10.10.11.1) 8. Next Hop ... (0.0.0.0) 9. Number Of VLAN Tags [0-2] ... (0) 10 . IP Tos [0-255] ... (0) 11. IP TTL [0-255] ... (128) 12. PSN Type> (IP) 13. Far End Interface Type> (T1 D4) 14. Payload Type> (Data) 15. Switches Sanity check (Discard) 16. Clock Recovery (Disable) 17. Differential Time [Usec] [1-512000] ... (5000) 18. Max Buffer Size [Usec] [0- 512000] ... (0) 19. Number Of Frames [1-1500] ... (80) 2 0. Reordering (YES) 21. L Bit & OOS> (OOS Mode Conditioning) 22. Redundant (Disable) 23. RTP Mode (Disable) 24. Connect / Disconnect (Connect) 25. Next Hop Type (IP) 26. Enable JB Reset> (On N Times) 27. Window Size [2-127] ... (10) --------------------------- ---------------------------------- Main Menu> Bundle Assignment 1. Link Number [1-8] .. . (1) 2. Bundle ID [0-4095] ... (1) 3. TS Route Type> (Coupled) 4. Timeslot Assignment [1-24] ... (1) 5. TS width> (8 Bits) The following is a typical configuration of TDMoP slave device using CESoP simulation in T1 framing mode. The TDMoP slave device completes the clock recovery function. TOP (T1) Main Menu> General Configuration 1. Source Mac address ... (0020D224A346) 2. Source IP 1 ... (10.10.11.1) 3. Source IP 2 ... (10.10.11.1) 4. IP Mask ... (255.255.255.0) 5. Default Gateway ... (10.10.11.99) 6. Max HDLC Frame Size [1-1800] ... (1800) 7. ARP wrong IP (CPU) 8. Wrong IP ( Discard) 9. Not Eth Type (CPU) 10. ARP my IP (CPU) 11. Not UDP type (CPU) 12. Not TDMoIP type (CPU) 13. Bundle number does not exist (Discard) 14. OAM packet (CPU ) 15. Auto Negotiation (YES) 16. Rate & Duplex> (100M_FDX) 17. Default ------------------------------ ------------------------------- Main Menu> Interface Configuration> T1 Screen Configuration Link Number [1-8] ... (1) 1. Frame Type> (SF) 2. RX Config Gain Limit (SHORT Haul) 3. OOS Code type (OOS Code) 4. Data TX / RX OOS [0-ff] ... (7E) 5. Idle Code [0-ff] ... (7E) 6. TX / RX Signal Mark code [0-3] ... (F) 7. TX / RX Signal Space code [0-3] ... (1 ) 8. TX / RX OOS Signal MASK> (Space) 9. Clock Source> (Recovery) 10. DSU / CSU (DSU) 11. DSU Mask> (0-133 feet) 12. Link Sync (62411) 13. Connect / Disconnect (Connect) 14. Recovery Clk Mode> (Auto) 15. Master's Side Clock Source> (Stratum 1) 16. Network type> (Router based) ------------------------------------------------ ------------- Main Menu> Bundle Configuration> CES Bundle Configuration Bundle ID [0-4095] ... (1) 1. Tx Bundle Destination> (Ethernet) 2. Rx Bundle Destination> (PCM) 3. Tx UDP Bundle [0-8191] ... (2) 4. Rx UDP Bundle [0-8191] ... (2) 5. Source IP addr> (IP 1) 6. Destination Main Mac addr ... (000000000000) 7. Destination IP address ... (10.10.10.1) 8. Next Hop ... (0.0.0.0) 9. Number Of VLAN Tags [0-2] ... (0) 10 . IP Tos [0-255] ... (0) 11. IP TTL [0-255] ... (128) 12. PSN Type> (IP) 13. Far End Interface Type> (T1 D4) 14. Payload Type> (Data) 15. Switches Sanity check (Discard) 16. Clock Recovery (Enable) 17. Differential Time [Usec] [1-512000] ... (5000) 18. Max Buffer Size [Usec] [0- 512000] ... (0) 19. Number Of Frames [1-1500] ... (80) 20 . Reordering (YES) 21. L Bit & OOS> (OOS Mode Conditioning) 22. Redundant (Disable) 23. RTP Mode (Disable) 24. Connect / Disconnect (Connect) 25. Next Hop Type (IP) 26. Enable JB Reset> (On N Times) 27. Window Size [2-127] ... (10) ---------------------------- --------------------------------- Main Menu> Bundle Assignment 1. Link Number [1-8] ... (1) 2. Bundle ID [0-4095] ... (1) 3. TS Route Type> (Coupled) 4. Timeslot Assignment [1-24] ... (1) 5. TS width> (8 Bits ) Before running NISTnet using NISTnet, execute the following command when the computer starts: modprobe nistnet This command can be part of the login script, or the user can create an executable file. Figure 6 shows an example script for an executable file named "statnist". 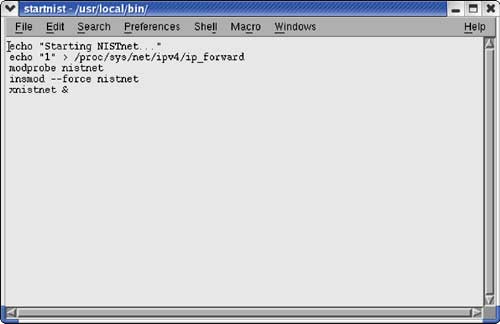 Figure 6. Sample script for an executable file named "statnist" If the user creates an executable file named "statnist", the NISTnet GUI command line becomes: startnist The NISTnet interface command line is: xnistnet The non-interface command line changes of NISTnet are: cnistnet Figure 7 shows the GUI interface of NISTnet. 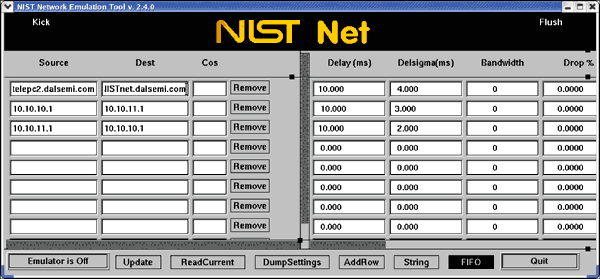 Figure 7. NISTnet GUI interface On the GUI interface, the user can enter the source address, destination address and network loss, such as the average delay and delay difference in ms, packet loss rate and packet repetition rate. After entering the value, the user can update the content. After the update is complete, click the "Emulator is Off" button to change it to "Emulator is On", and the simulator is turned on. Figure 8 shows the GUI diagram after opening the simulator. 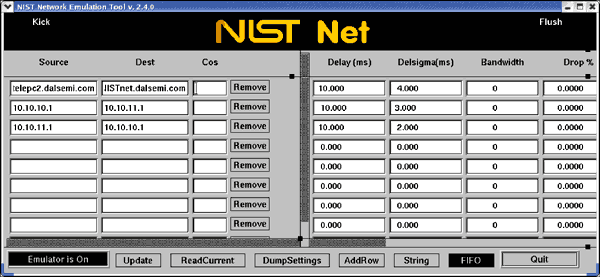 Figure 8. NISTnet GUI interface after the simulator is opened Conclusion Through NISTnet, a single Linux PC can be set as a router, which can simulate various network environments. For more information about NISTnet, please visit the NISTnet website :. |
Cixi Xinke Electronic Technology Co., Ltd. , https://www.cxxinke.com