Production of wireless microphone
Principle of wireless microphone: The electronic component microphone (microphone) on the circuit board first converts the natural sound signal into an audio electrical signal. This electrical signal will modulate the high-frequency signal generated by the electronic oscillator. Finally, high-frequency signals are transmitted into the air through the antenna.
We design the transmission frequency in the FM radio band, so we can cooperate with any FM radio to receive the high-frequency signal and restore the sound signal from the high-frequency signal to complete various uses.
Wireless microphone use:
1. Wireless microphone: When singing, speaking or performing, users can rotate and move 360 ​​degrees arbitrarily without any wire stumbling or hind legs.
2. Wireless broadcasting: Teachers broadcast live during lectures, and countless students can use radio to receive lectures, greatly increasing the number of students attending the lectures.
3. Wireless selling device: When selling goods on the street, selling with a wireless microphone has a certain novelty and will receive better advertising effects than ordinary microphones.
4. Wireless eavesdropping device: It has better concealment and safety, and can be listened to with radio earphones at a distance, without worrying about embarrassment of meeting on the spot.
5. Wireless holding alarm: Unattended at a certain distance. For example, you can monitor the sound of the door lock on the first floor on the second floor and act as an anti-theft alarm.
6. Wireless electronic doorbell: Since the sound can be transmitted wirelessly, the doorbell sound can also be transmitted wirelessly, and the pairing can also be converted into a wireless intercom.
7. Wireless electronic musical instruments: The sounds of musical instruments such as harmonica, erhu, guitar and so on can be received by radio, or expanded and broadcast by power amplifier, which can better enjoy music.
8. Electronic hearing aid: By adjusting the volume of the radio or microphone, the sound is amplified and then sent to the headset, which can effectively improve the hearing of the elderly.
9. Sound-controlled small colored lights: Change the speaker at the output end of the high-power amplifier into 6V and 12V car bulbs of equivalent wattage, adjust the volume and position.
10. Reading memory enhancer: Similar to hearing aids, aim the microphone at yourself and listen to your own reading sound to eliminate outside interference and play the role of concentration.
11. Small radio station: Suitable for schools, factories and other units to organize various programs on their own. They can play music, news, announcements, etc., and listen to them on the radio.
12. TV audio transponder: Listening with headphones while watching TV does not affect the sleep of others, but is controlled by the length of the headphones. This device is not subject to this restriction.
Wireless microphone description:
The above are some of the functions or uses that wireless microphones can achieve. This site is for the purpose of everyone learning technology, so regardless of the practical value of the product, cost and other factors, our purpose is to hope that everyone learns technology and experience in production practice.
If you want the wireless microphone to have a good effect, please use a good Power Supply, antenna and other devices, and debug the circuit in the best state. The enhanced wireless microphone (component package) of this site will have a longer distance and higher performance, and it has certain practical value.
If you need to have a longer distance (greater than 500 meters) and higher performance, please apply to the radio management department first, then see  http: // Related articles, I suggest you design it yourself or entrust this site or others to design it.
Wireless microphone statement:
Our firm sells and publishes related technologies at a low price, and also provides circuit boards and component packages. The purpose is to encourage everyone to love science, learn science, and do more, to become a national pillar as soon as possible, and to lay the foundation for the future of the motherland's wireless communication on Mars.
We apologize for the losses caused to the manufacturers of related electronic products, and we are not intending to disrupt the market.
For those who want to use this product and technology for illegal purposes, we advise that earning money in the right way, please do not violate the law!
Assembly instructions:
1. Resistor ceramic capacitors do not need to be divided into positive and negative poles, but care must be taken not to make mistakes in resistance and capacitance. Please refer to the relevant methods described in our electronic experiment kit.
2. The microphone on the board has positive and negative polarities, one pole connected to the aluminum casing is negative pole, and the other pole is positive pole. In order to install the circuit board, please solder two feet first.
3. The functions of the three pins of the transistor are completely different, so they must be clearly distinguished. Please refer to the identification methods provided in the relevant electronic materials such as the electronic experiment suite and website of this site.
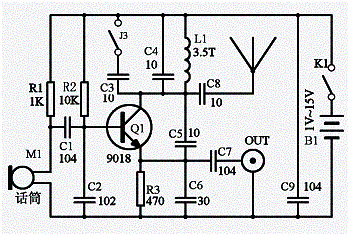
4. There is a coil made of copper wire in the component package, and there is a layer of insulating paint on its outside. It is a key component. Adjusting the coil spacing can change the transmission frequency and distance.
5. The component package contains circuit board pins, which can be used flexibly with the electronic experiment kit after being installed at key points, so that a wider range of electronic experiments can be done.
6. Please do not install the components in the wrong position. Welding time should be controlled within 2-3 seconds. The components should be placed in place and beautiful. After multiple inspections, they can be debugged and used.
Commissioning instructions:
First find the FM radio (recording) recorder, turn on the power and volume, and adjust the frequency to a place where there is no radio around 100MHz. Apply power to the wireless microphone circuit board and aim it at the radio,
Use a screwdriver (a conditioner please use a non-inductive screwdriver, or see the website to make) to adjust the sparseness of the oscillation coil L1 (coil turn distance) until the radio screams.
At this time, slowly move the distance between the microphone and the radio, and at the same time appropriately adjust the volume of the radio (or microphone board) and the tuning knob until the sound is clearest and farthest away.
It is recommended to try the above steps in the vicinity of 88MHz, 98MHz, and 108MHz, so that even if there is a large deviation in the transmission frequency of the wireless microphone, the radio can receive it.
If the radio still cannot be received, please check whether the components are installed incorrectly, whether the components are damaged, and whether the power supply is normal. Wuyi electronic website, electronic experiment kit, friends around you and books in the bookstore can help you solve this problem.
related experience:
The closer the distance between the turns of the wireless microphone coil L1 and the larger the capacitance of the exchange capacity, the lower the transmission frequency; to make the transmission frequency higher, the opposite measures need to be taken.
The variation range of the capacitor in parallel with L1 should not be too large or too small, otherwise the transmission frequency will be biased out of spectrum, and even high-frequency transmission signals will not be generated (the circuit will not oscillate).
If you want a longer transmission distance, please add a better antenna to the radio and wireless microphone, and appropriately increase the power supply voltage of the wireless microphone.
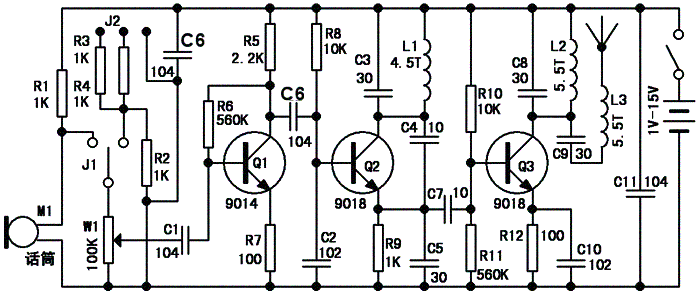
L2 in the simple wireless microphone is short-circuited with iron wire; adjusting L2 and L3 in the enhanced wireless microphone can make the distance reach the farthest.
The use of high-end radios with higher sensitivity and selectivity allows for longer distance reception.
Attached circuit schematic diagram:
Simple schematic diagram: 
Enhanced schematic diagram: 
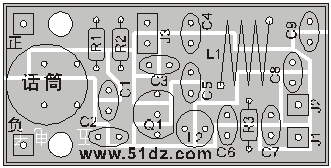
Attached component location diagram:
Simple circuit board diagram: 
Enhanced circuit board diagram: 
Diy Game Kit Arcade Joystick Diy Diy Game Console Kit Diy Handheld Game Console Kit
Guangzhou Ruihong Electronic Technology CO.,Ltd , https://www.callegame.com