In daily work, we often need to set up a remote boot of a specific computer in order to perform some remote operations. For example, when you arrive at the company and find that the document is forgotten on your home computer, you need to extract the document through the remote desktop. However, remote shutdown is easy to implement, but unattended remote boot is a headache. Because the operating system is not running when you shut down, how do you turn on the remote boot? It is now possible to use the network card wake-up function.
We all know that through the BIOS setup, the computer can be turned on via the keyboard or mouse when the power is on standby. In the same way, many computers now support Wake on LAN, which means Wake On LAN (WOL) wakes up remotely. Now most network cards support this feature. For Windows 10 users just open "Control Panel\Network and Internet\Network Connections" and double-click to open "Ethernet". In the open window, switch to "Properties → Network → Configuration" and look in the open properties window to see if there is something like "Wake "On Magic Packet" option, if there is one and set its value to "Enable" to support remote wakeup (Figure 1).
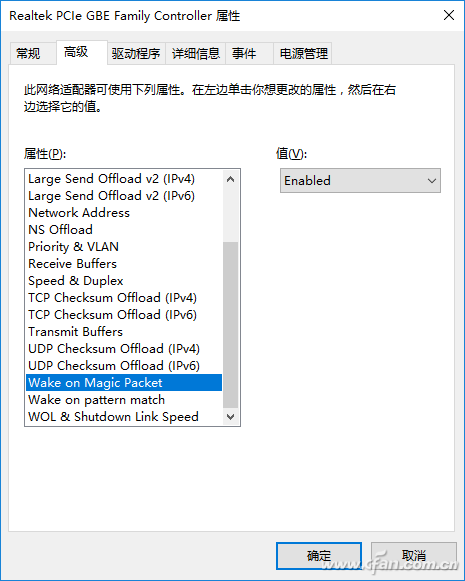
Figure 1 Check whether the network card supports remote wake-up
What is MagicPacket? Actually, this is a MAC address packet containing 6 consecutive bytes of "FF" and repeated 16 times in succession. For a network card that supports "Wake on Magic Packet", if it can receive a packet containing "FFFFFFFFFFFF" + MAC address with 16 consecutive repetitions, then the network card will automatically wake up the computer (similar to the mouse booting, the BIOS detects the mouse movement message) Will wake the computer later). MagicPacket can be sent by other remote computers with the help of Magic Packet Utility, WakeOnLanGui, etc. The receiving end can be implemented by a router. In this case, the router is mapped to the designated computer through the forwarding port. It is assumed that the machine A, so that the network card of the machine A receives the MagicPacket packet. Will wake the computer, this is the principle of remote boot network card (Figure 2).
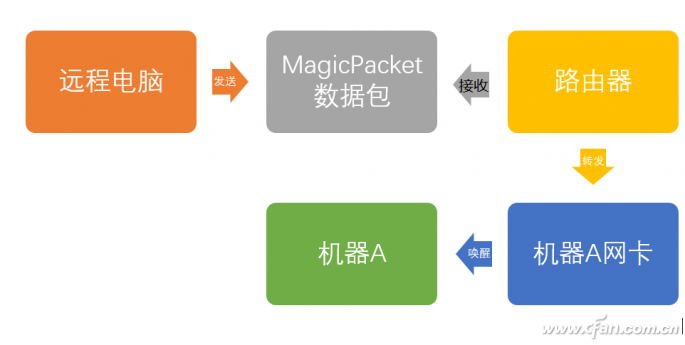
Figure 2 Network card remote boot schematic
As mentioned above, the booted computer assumes that the machine A is to be remotely booted. The key is that the network card must be able to receive a packet containing a "FFFFFFFFFFFF"+MAC address that is repeated 16 times in succession from the remote computer. Therefore, you need to make the following settings on the machine A.
Secondly, remote wake-up also requires motherboard support. First, check whether the motherboard supports Wake-up OnLAN (WOL) technology. Enter the BIOS settings according to your motherboard instructions to see if there is a “Wake Up On LAN†option and set its value to “ Enable, press F10 to save and exit (Figure 3).
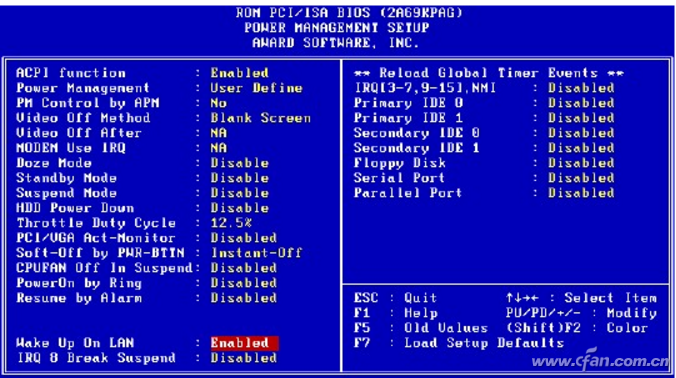
Figure 3 Board wake up settings
Finally, set the IP address of the local intranet to a fixed address. After entering the NIC attribute setting window, select “Use the following IP address†and set the IP address, subnet mask, gateway, DNS address, and other information according to your actual network environment (Figure 4).
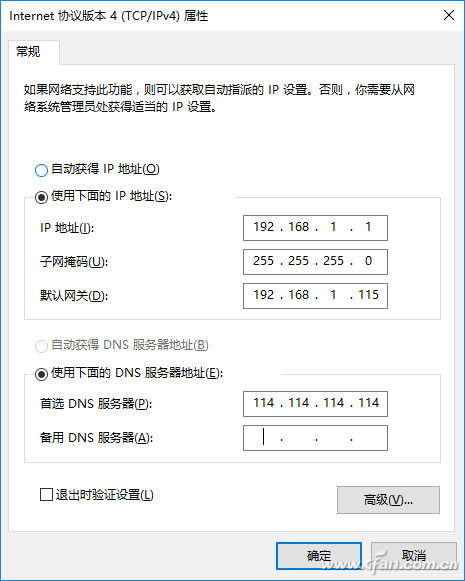
Figure 4 Fixed local IP address
After ensuring that your network card and motherboard support remote wake-up, the next step is to set up a computer network card to receive magic packets and other information. Because most people's computers are now in the LAN under the router, so that the network card of machine A can receive the magic packets accurately, it also needs to be set on the router as follows (here the Tplink router is used as an example):
1. Establish port mapping
Expand the "Forwarding Rule → Virtual Server" on the left panel, click "Add New Item", add a new item in the window that opens, the server port is 77 (can be set arbitrarily, but do not duplicate with other default ports), internal port number Streaming, the IP address is the fixed IP address set above, the protocol is UDP, and it is in the "effective" state. After receiving the magic packet, the router forwards it to the computer 192.168.1.115 to activate the remote wake-up function of the network card (Figure 5).
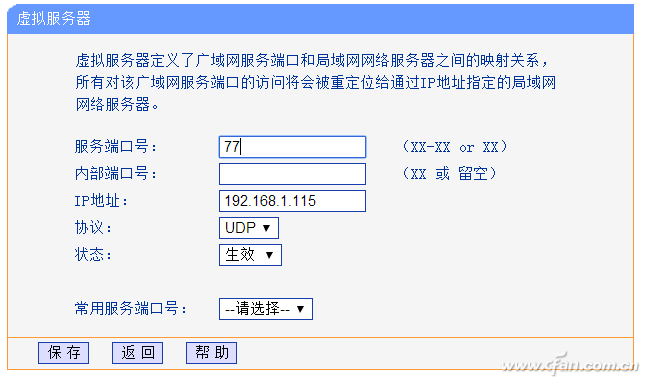
Figure 5 Port Mapping Settings
2. Set static IP
Expand the right side panel "DHCP server → Static Address Reservation", click to add a new entry, enter the address of the local network card in the MAC address, the IP address enter the fixed IP address information set above, the status is "effective", so that after the computer starts Make sure you can get 192.168.1.115 (Figure 6).
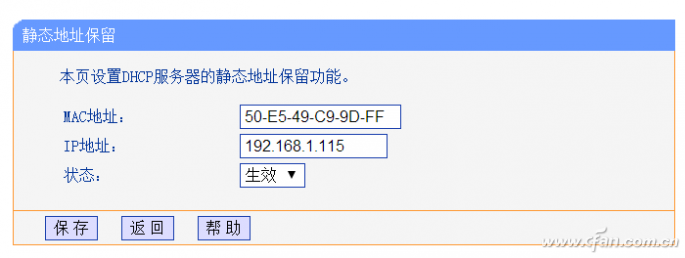
Figure 6 Setting static address reservation
3. Start DDNS function
Because many home broadbands are dynamic IP addresses, this can cause inconvenience when sending magic packets to a controlled computer on other computers. You can use a dynamic domain name service to ensure that you can access routers through dynamic domain names. Switch to "dynamic DNS" and register for a peanut shell dynamic domain name service.
After completing the above settings, it is now possible to use the "WakeOnLanGui" on the unit computer to send magic packets. After launching the software, enter the following information as prompted and click "Wake up" (Figure 7):
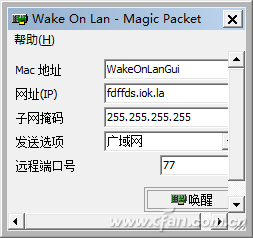
Figure 7 Send magic package settings
MAC address: fill in the remote network wake-up network card MAC, the specific address information can be entered at the secret prompt "ipconfig / all" obtained.
Website (IP): fill in the dynamic domain name obtained from peanut shell (you can directly enter the IP address of the local external network, because the local network IP will only change after restart, so no dynamic domain user can directly enter the router to view, Remember that the router can be used without rebooting.)
Subnet Mask: If you wake up over the Internet (public/extranet), fill in 255.255.255.255
Send Options: Wide Area Network
Remote port number: Port number 77 set by the above router
In this way, as long as we open the remote desktop connection on the machine A, remote boot through the network card, on the company's computer through the remote desktop file extraction and other operations.
Neodymium Tweeter,Tweeter Horn Driver,Neodymium Compression Driver,Neodymium Speaker Drivers
Guangzhou Yuehang Audio Technology Co., Ltd , https://www.yhspeakers.com