Foreword: Recently, based on the dragonboard410c, a demo is used, in which the ultrasonic module is used to measure the distance to achieve a certain distance when the person is close to the ultrasonic wave, the driver will report the single and activate the application layer. This driver is a bit simple to write, if you have any insights you can ask.
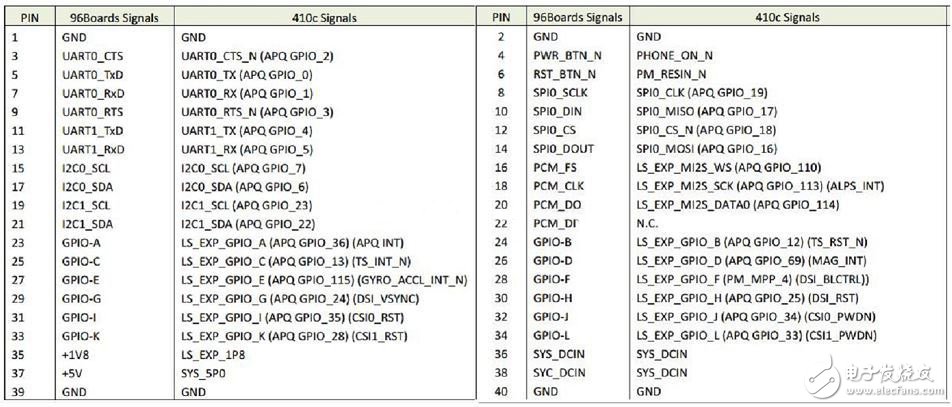
First, the hardware to build 1.Dragonboard410c development board:The low-speed interface pin1, pin23, pin25, ping35 corresponding GPIO interface, see the " Low speed Expansion connector " distribution map
Before powering up the module, first remove the jumper cap on the mode selection jumper to put the module in level trigger mode.
The timing of the level-triggered ranging is shown in the figure:
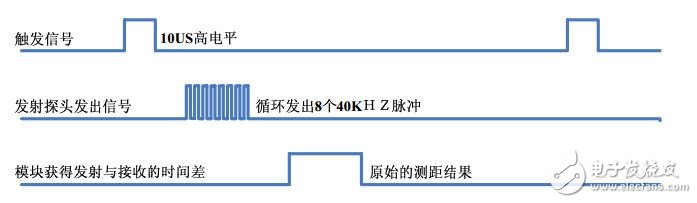
Only need to input a high level above 10US on the Trig/TX pin, the system can send 8 40KHZ ultrasonic pulses, and then detect it back.
Wave signal. When the echo signal is detected, the module also measures the temperature value, then corrects the ranging result according to the current temperature, and outputs the corrected result through the Echo/RX pin.
In this mode, the module converts the distance value to twice the time value at 340m/s, and outputs a high level through the Echo terminal to calculate the distance value based on the duration of this high level. That is, the distance value is: (high time *340m/s)/2.

According to the blog tutorial, download the corresponding source code and compilation tools on the host with Ubuntu.
Note: In the dts, you need to modify the apq8016-sbc.dtsi file to increase the node information of the ultrasonic driver:
Sonar{
compaTIble = "thundersoft,sonar";
Thunder, poll_TIme =<50>;
Thunder, gpio_cmd = <&msm_gpio 13 0>;
Thunder, gpio_irq = <&msm_gpio 36 0>;
};
Third, the driver writes 1.//match device tree definition interfacestaTIc int parse_dt(struct platform_device* pdev,struct us100_data* data){
Int rc;
Struct device_node* node = pdev->dev.of_node;
/ / Write node 50 to poll_TIme
Rc = of_property_read_u32(node, "thunder, poll_time", &data->poll_time);
If(rc){
Pr_warning("%s you should point time",__FUNCTION__);
Data->poll_time = 20;
}
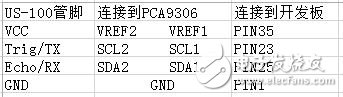
/* --TrigPin3---PIN25---- gpio13---- gpio_cmd ---cmd_gpio----------- */
Data->cmd_gpio = of_get_named_gpio(node,"thunder,gpio_cmd",0);
/* --EchoPin2---PIN23---- gpio36---- gpio_irp ---echo_gpio----------- */
Data->echo_gpio = of_get_named_gpio(node,"thunder,gpio_irq",0);
If(data->cmd_gpio<0 || data->echo_gpio<0){
Pr_err("%s,error gpio",__FUNCTION__);
Return -EINVAL;
}
Return 0;
}
2.//Start and turn off square wave generationStatic ssize_t hs100_store_enable(struct device *dev,
Struct device_attribute *attr,
Const char *buf, size_t size){
Struct us100_data* data = dev_get_drvdata(dev);
Int enable = simple_strtoul(buf,NULL,10);
If(enable){
/ / Call cmd_work_func
Schedule_delayed_work(&data->cmd_work,0);
Data->enable =1;
}
Else{
/ / Cancel the call cmd_work_func
Cancel_delayed_work_sync(&data->cmd_work);
Data->enable=0;
}
Return size;
}
3.//Achieve 12us square wave functionStatic void cmd_work_func(struct work_struct* work){
Struct us100_data* data = container_of(work,struct us100_data,cmd_work.work);
Gpio_set_value(data->cmd_gpio,1);
Delayed 12us to generate a square wave
Udelay(12);
Gpio_set_value(data->cmd_gpio,0);//genarate a 12 us pluse
// printk("%s send cmd", __FUNCTION__);
/ / Activate the cmd_work_func in the work queue
Schedule_delayed_work(&data->cmd_work,msecs_to_jiffies(data->poll_time));
}
/ / Realize the function of obtaining the actual distance
Static void report_work_func(struct work_struct* work){
Struct timespec now,last;
S64 diff_time;
/*---Get the first address of the structure variable through the first address of the member in the structure ---*/
Struct us100_data* data = container_of(work,struct us100_data,report_work);
/ / Time format conversion
Now = ktime_to_timespec(data->now_ktime);
Last= ktime_to_timespec(data->last_ktime);
//Time difference
Diff_time = now.tv_sec*1000000000UL+now.tv_nsec-last.tv_sec*1000000000UL-last.tv_nsec;
// printk("ns=%lld", diff_time);
Mutex_lock(&data->data_lock);
// Actual distance
Data->distance = diff_time*170*100*10/1000000000UL;
Mutex_unlock(&data->data_lock);
Data-> data_ready = true;
// wake up the process specified by the data_queue registration queue
Wake_up_interruptible(&data->data_queue);
// printk("dis=%d",data->distance);
}
Epoxy Resin Seal Sensor
Epoxy resin seal type NTC temperature sensor with the properties of good stability, fast response, temperature resistance, convenient to use, has been already applied to air conditioner, automotive, electrical appliance and induction cooker. Temperature range is from -30°C to 105°C.
Epoxy Resin Seal Sensor,Stability Sensor,Greenhouse Sensors,Bus Sensor
Feyvan Electronics Technology Co., Ltd. , https://www.fv-cable-assembly.com