Cutting
The purpose of the cutting process is to divide large sheets into smaller pieces that meet specific customer requirements, as outlined in the engineering data MI. This ensures that each piece is precisely sized and ready for further processing.
The process involves preparing the large sheet material, then cutting it according to the MI specifications using a cutting board. Afterward, the edges are rounded through a grinding process before the final boards are removed from the machine.
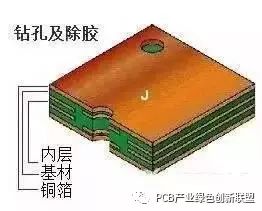
Drilling
Drilling is performed to create precise holes in the sheet based on the engineering data. These holes are essential for component placement and electrical connectivity.
The procedure includes stacking the plates with a pin, placing the upper plate, drilling, followed by the lower plate. After drilling, the board undergoes inspection and any necessary repairs to ensure quality standards are met.
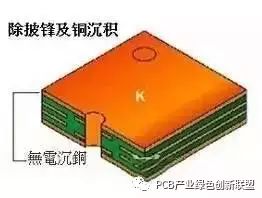
Copper Sink
The objective of the copper sink process is to chemically deposit a thin layer of copper onto the walls of insulating holes. This step is crucial for ensuring good conductivity and reliability in the final product.
The process begins with rough grinding, followed by hanging the board and running it through a copper line automatic system. After dipping in diluted sulfuric acid, thick copper plating is applied to enhance the structural integrity of the board.
Graphics Transfer
The graphics transfer process is used to apply the design patterns from the production film onto the board. This is a critical step in defining the circuit layout.
There are two common methods: the blue oil process involves grinding the board, printing on both sides, drying, and then exposing and shadowing the image. The dry film method includes laminating, exposure, and developing the pattern for accurate reproduction.
Graphic Plating
Graphic plating is the process of depositing a controlled thickness of copper, gold, or tin onto the exposed copper areas of the board. This enhances conductivity and provides protection against corrosion.
The steps include loading the board, degreasing, water washing, micro-etching, pickling, copper plating, nickel plating, and finally gold plating, followed by thorough rinsing and unloading.
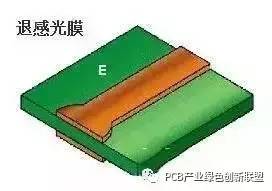
Ejection
The ejection process removes the anti-plating coating using a sodium hydroxide solution, exposing the underlying copper areas that were not meant to be plated.
For wet films, the board is soaked in alkali, washed, scrubbed, and passed through a machine. For dry films, the board is simply placed and passed through the machine for removal of the coating.
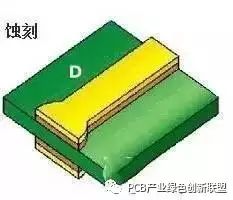
Etching
Etching is a chemical process used to remove unwanted copper from non-conductive areas of the board, leaving only the desired circuit paths intact.
Green Oil
The green oil application transfers a protective pattern onto the board, shielding the copper traces and preventing solder from adhering to areas where it's not needed during soldering operations.
This involves grinding the board, printing the photosensitive green oil, baking, and then exposing and shadowing the image. Both sides are processed in a similar manner to ensure even coverage.
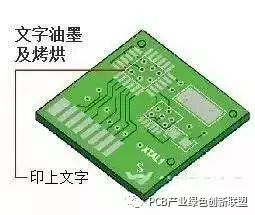
Character Printing
Characters are printed on the board to provide clear identification marks, making it easier to recognize and handle the finished product.
After the green oil is applied, the board is cooled, the network is adjusted, and characters are printed. The process concludes with additional finishing steps to ensure clarity and durability.
Gilded Finger
The gilded finger process involves coating the plug-in fingers with a thin layer of nickel and gold. This improves the mechanical strength and wear resistance of the connectors, ensuring long-term performance.
The process starts with loading the board, followed by degreasing, water washing, micro-etching, pickling, copper plating, nickel plating, and finally gold plating, with thorough rinsing at each stage.
Tin Plate (Solder Coating)
The tin plating process involves applying a thin layer of lead-tin alloy to the bare copper areas not covered by solder resist. This prevents oxidation and ensures excellent solderability during assembly.
Steps include micro-etching, air drying, preheating, rosin coating, solder coating, hot air leveling, cooling, and final washing and drying to ensure a clean, uniform finish.
Forming
Forming is the process of shaping the board to meet customer specifications. This can be done using die stamping, CNC machines, or manual techniques such as hand cutting.
Note: Data boards and beer boards offer the highest precision, while hand-cut boards are suitable only for simple shapes and have lower accuracy compared to automated methods.
Testing
The testing phase uses 100% electronic testing to identify hidden defects like open circuits or short circuits that may not be visible to the human eye.
The process includes loading the mold, releasing the board, performing the test, inspecting with FQC, repairing if necessary, and repeating the test until the board passes or is scrapped.
Final Inspection
The final inspection ensures that all visual defects are identified and minor issues are repaired to prevent defective boards from reaching the customer.
The workflow includes receiving materials, checking the data, conducting a visual inspection, random sampling by FQA, packaging, and processing any unqualified boards until they meet the required standards.
Welding Cable,Welding Earth Cable,Flexible Welding Cable,Copper Welding Cable
HENAN QIFAN ELECTRIC CO., LTD. , https://www.hnqifancable.com